

Logging into WordPress for the first time in 7+ years
A lot can happen in 7 years.
You could have 7 birthdays.
You’d probably have time to get married, divorced and then re-married again.
It’s really quite a long time.
Seven years ago was the last time I made a post on this blog. Do I remember making the post? You bet I don’t. That’s how long 7 years is, you forget the important things in life like what you posted about on a low traffic blog.
The reason for posting today is actually a rather mundane one. For months I have been getting emails about spam comments being posted on this blog and like any good webmaster I’ve been ignoring them.
But it’s half term here in the UK, the kids are at home (yeah, I have real life human kids now, a lot can happen in 7 years) and faced with the choice of an afternoon playing snakes and ladders or fixing up a really old WordPress website….well, here I am.
What did I learn after logging into this WordPress site for the first time in 7 years?
- If you use a custom admin URL it would be very beneficial to make a note of what it actually is. I spent a good 5 minutes trying to remember it and in the end I ended up disabling the plugin and am now back to the default wp-admin (do your worst bots).
- Akistmet doesn’t like old API keys. Spam was an issue 7 years ago and its still an issue now. It turns out that my 7+ year old Akistmet API was no longer valid and as such the spam bots were having a comment orgy on my website. Updating the API should put an end to their shenanigans.
- Any user of the website that isn’t me has been binned. Apologies if you have been quietly sitting there for 7 years as a registered user of the website just waiting to make a comment with your pic next to your name but you’ll just have to be anonymous from now on. I had a TON of spammy users sign up so I decided the best option was to wield a very broad axe to my user list.
- My WordPress theme doesn’t hold up too bad. I mean it’s not going to win any awards (who likes awards anyway, not me or Will Smith that’s for sure) but if you view it on a desktop computer and look at it from a certain angle with a slight squint it doesn’t look half bad…a bit like seeing your half cousin at a wedding after a few drinks (incest joke). But for gods sake don’t look at it on a mobile device, that’s a big no no.
- The *new* WordPress block editor is still god awful. I come across it all the time in my day job (web hosting – D9 – buy stuff – good support – fairly cheap – still going strong – etc) but when you actually try and write a simple text based post using it my word what an animal.
The kids have gone to the supermarket with their Mum. Peace.
See you in 2029.
VAT MOSS – Here’s My Practical Accounting Solution To The New EU Digital Services VAT Rules
Please Note: This article contains practical VAT MOSS accounting advice for UK businesses and Individuals/Sole Traders. If you are from another EU Country then the accounting system I use wont apply to you, but it’s probably worth a ready anyway!
Sellers of digital goods and services have been up in arms about the new EU “Place of Supply” rules that came into force on January 1st 2015.
Unless you’ve been living under a rock, or a similar large object, then you wont need me to explain the new rules to you, but for those of you that are rock dwellers then here’s a brief paragraph explaining the nuts and bolts of it all.
On January 1st 2015 the EU introduced new VAT rules stating that VAT must be charged on all digital goods and services based on the location of the customer, rather than the location of the seller. The VAT that is collected should then be distributed to each individual country. So rather than a UK business charging 20% VAT to all EU customers, they will now have to charge VAT based on the VAT rate of the customers country. When the VAT has been collected two different VAT returns then need to be filed – one for UK customers (the standard VAT reutrn) and another for EU customers (using the new HMRC VAT MOSS system).
This new legislation has caused what can only be described as mass hysteria, with some people claiming the new rules will force them to ban all sales to EU customers and some even claiming that it will force them out of business altogether.
So for the benefit of those that are still in the mass hysteria camp, I thought I would put together this article to show you exactly how my business is handling the accounting side of things when it comes to the new EU Rules.
A Bit of Background Info – I run a UK Limited Company with my business partner that provides Web Hosting and Domain Registration services. We have clients from all over the globe, including some from non-UK EU countries. Prior to the new EU VAT rules coming into play we were already VAT registered so all EU customers were charged the UK VAT rate of 20%. As of January 1st 2015, we had to ensure that we were registered with the HMRC VAT MOSS system and that all non-UK EU customers were charged at their local VAT rate rather than the UK rate.
Here’s How We Complied With The New EU VAT Rules
 =========================================
1. We signed up for the VAT MOSS system and received our VAT MOSS registration number. If you haven’t already signed up for VAT MOSS you can do so here:
https://www.gov.uk/register-and-use-the-vat-mini-one-stop-shop
* If you are not already VAT registered with HMRC, then you will need to first register for VAT before you can sign up for the VAT MOSS service (https://www.gov.uk/vat-registration/how-to-register)
2. We modified the Tax Rules in our billing system to ensure customers were charged the correct VAT amount based on their location
3. We enabled the “VAT MOSS” option in our accounting system; KashFlow
4. We sat back and drank cocktails on a beach whilst a group of super models played volleyball for our amusement
…….Okay, maybe that’s a little bit too simplistic! So let me go into more detail for you, I’ll even throw in a few screenshots for added value.
Here’s How We Complied With The New EU VAT Rules (More Detailed and with Screenshots!)
=======================================================================
Registering For VAT and VAT MOSS
I wont go into much more detail about signing up for the VAT MOSS system since it’s fairly self explanatory; if you’re currently VAT registered then simply activate the VAT MOSS service and if you aren’t currently VAT registered then register for VAT and then activate the VAT MOSS service – easy peasy!
* If you are currently below the UK VAT threshold then you still need to register for VAT, but you don’t need to charge VAT on sales to your customers located in the UK
Setting Up Tax Rules For Your Customers
This is dependent on the system you are using to process orders. From my perspective, we use an order system that allows us to specify tax rules on a per country basis, so setting tax rules wasn’t an issue. If you are taking orders using a 3rd party ordering script on your website then it will almost certainly allow you to set up tax rules. If it doesn’t, use something else as it isn’t fit for purpose!
If you are using a 3rd party processor to take your orders (i’m looking at you JVZoo!) then they should have already implemented a solution to add tax to your orders based on the location of the customer, I know this is the case with JVZoo and I’ve seen a lot of articles about similar services doing the same. So it’s just a case of enabling that option from within your 3rd party processors website.
If neither of the above applies to you, and you’re still just using a PayPal button on your website for taking payments and processing orders then you can set up the tax rules from within your PayPal account. Just go to Profile > Selling Preferences > VAT and enter the different VAT rates for each EU country.
Accounting For The VAT That You Collect
This seems to be the part that has got everyone in a panic. You’ve got yourself registered for the VAT MOSS system, you know how to collect the tax from your customer BUT how do you actually go about keeping your UK and EU sales seperate and how do you do the accounting side of things!?
Surely this is going to mean tons of paper work and man hours to sort out?
…..NOPE, DON’T PANIC, A SOLUTION IS AT HAND!
We’ve been using an accounting system called KashFlow for years. As soon as an invoice gets paid by a customer, it’s passed over to our accounting system, this includes all the details of the customer as well as all of the invoice information – invoice number, date generated, date paid, VAT rate, total VAT paid as well as the transaction ID.
As of January 1st 2015, KashFlow rolled out a VAT MOSS feature that allows UK businesses, individuals or sole traders to easily account for the new EU VAT changes.
So all that’s needed is for you to enter your customer and sale data into the system and let KashFlow take care of the rest – when it comes to filing your quarterly VAT and VAT MOSS return a couple of clicks are all that’s needed. If you only have a small number of customers and sales then you can enter them into the KashFlow Accounting System manually or if you have a lot of customers then you can use their API to automatically enter all customer and sales data into the system. (This is what we do)
* If you are looking for a programmer to create a KashFlow API script for your ordering platform then please get in touch with me and I’d be happy to help, we spent months tweaking our own KashFlow API script to work the way we wanted so we know the API pretty much inside out!
Once you’ve decided how you’ll be entering the data into KashFlow (manually or automatically via the API), here’s how you can activate the VAT MOSS option:
1. Sign up for KashFlow if you haven’t already (there’s a free trial available and at the time of writing the monthly cost is from £5 – £10 depending on the package you need)
2. Log in, and go to Settings > VAT Settings.
Next scroll down to the section “Mini One Stop Shop (MOSS)†and tick the box.

3. You then need to tell KashFlow that the product/service you sell is a digital service.
To do this Navigate to Settings > Sales Codes
You can then edit an existing code, and check the “Digital Services” box, or you can create a new Sales Code.
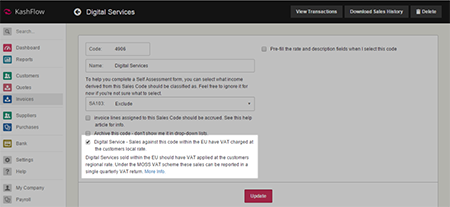
* If you only sell digital products/services then I would recommend setting your digital services sales code as the default sales code, this will mean all products that you sell will automatically be recorded as digital services
4. You’re done!
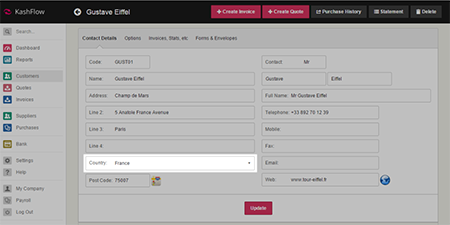
As long as you have specified the customers country correctly, then KashFlow will automatically know to keep your UK and other EU sales seperate and it will produce the two VAT returns for you each quarter, all you need to do is to click on the “Submit Return” button and you’re done!
So that’s how we’re coping with the new EU VAT rules. Admittedly, since we were already VAT registered it was very easy for us to get set up for VAT MOSS and since we were already using KashFlow it was easy for us to enable the VAT MOSS reporting.
If you’re starting from scratch then I appreciate that it may all seem daunting, and it may take you a day or two to get everything set up but trust me when I say that VAT accounting and reporting isn’t nearly as scary as it sounds, especially if you have good systems in place to help you along the way!
I hope this article has gone some way in helping you get your head around the practicalities of it all, if you have any comments or questions please feel free to leave them in the comments section below. Although do remember I’m most certainly not an accountant, but if you need advice on how to tweak your systems to comply with the new EU VAT rules then I’ll do my best to assist.
To Facebook or not to Facebook?
I was supposed to be outside helping to clip some sheep today (new readers and those of you that are unobservant – I live on a real life farm), but the sheep clipping man has failed to turn up.
I believe the Americans would describe him as having “demons”, and us Brits would describe him as “an alcoholic”, all I know is that it usually takes him until at least 11.30 (am) for the smell of booze to be replaced by the smell of Red Bull, but I digress, on with the blog post.
When I’m not sat behind a computer screen writing moderately offensive things about my farming workforce and wondering to myself if said workforce man is ever likely to buy a computer and read this blog, I provide web design and hosting services to local businesses.
Recently some of these businesses have been asking me about Facebook, they’ve seen the little blue icon everywhere and they want a piece of the action, but what’s the point?
Does a Facebook page really help a business?
*prepare for mass un-researched personal opinion presented as fact*
In my opinion, it depends, and here’s why.
Facebook was (ironically) invented by geeks, a tribe of people known for their lack of social skills, but despite that, they created the biggest socialising medium the world has ever seen. (BOOM, there’s the irony)
It was created as an easy, geek friendly way to keep in touch with class mates and friends through a centralized system, at this point business and marketing had never even been considered, it wasn’t until the Facebook boom that businesses caught on that you could get in touch with potentially millions of people who would be interested in their product with little or no cost, it was at that point that more and more businesses decided to join Facebook.
But joining Facebook and creating a fan page doesn’t equal instant success.
Facebook is still primarily used for it’s original purpose, and as the years have gone by lots of great new features have been added to make it more accessible for people, whose primary goal is to keep in touch with friends and relatives. For example, here’s what the majority of people use Facebook for:
1. Impressing your friends with your amazing sense of humor, despite having clearly copy/pasted the joke from elsewhere.

2. “Checking in” to cool places with other people, to make people sat at home on Facebook feel jealous of your coolness and popularity, not only do you go places, but you feel the need to tell people where you’ve been.

3. Taking pictures of yourself in situations you believe will make you seem more attractive and desirable to the opposite sex.

4. Showing everyone what a great sense of humor you have by liking amusing things that other people have written.
![]()
5. Flirting with Crystal St ‘Clare

6. Trying to convince people that your taste in music is better than theirs by posting links to countless Youtube videos.

It’s all very vain, mindless, and shallow, but nobody cares, because it’s all a bit of fun, you go on Facebook and you can turn your brain off and relax. That’s what Facebook is good for.
When you are on Facebook “doing your thing”, do you really want to know that Joe the local window cleaner has just “cleaned one of the biggest windows I’ve ever seen, it was banging”, or that Mary the local Baker just made an exceptionally nice batch of pies….bad example, I probably would want to know that.
But my point is kind of in there somewhere, people don’t log onto Facebook to see what a local business is doing.
If you run a business (and I do, so I can relate to this) it does tend to rule your life somewhat, you are passionate about it and want to tell people about it, but in reality do the people on Facebook really care?
A real life example for you, one of the companies I work with designs bespoke furniture, and they’ve just created a Facebook fan page. Now how often are you likely to buy a new sofa, once every 4 or 5 years maybe. When you walk into the showroom to check out the sofas, that’s what you are concentrating on, your mission for the next few hours is to buy a sofa, but once it’s bought, that’s it. Is the customer going to get any benefit from “Liking” the company on Facebook and having to put up with their Sofa related status updates for the next 4 – 5 years, I doubt it.
However, it’s not just local businesses that are on Facebook, all the big multi-national’s are on there as well. Look what I found just this morning whilst I was having my breakfast:

Now I like Crunchy Nut Cornflakes as much as the next man, but what would be the purpose of “liking” them on Facebook? Would all of my friends see that I liked Crunchy Nut Cornflakes and suddenly have an urge to go buy some?
I tried to find out more information on what the purpose of the Crunchy Nut Cornflakes facebook page was all about, but when I clicked on the link it didn’t work:

McDonalds are at it was well, in the past 2 weeks I’ve “liked” every Mc* there is, but after “liking” the page, absolutely nothing, so what’s the point of them spending money on a team of boffins to put together a Facebook page that will serve no benefit to me, and ultimately them? I’m starting to think it all must be part of a masterplan and it’s going way over my head.
Not all Facebook pages for businesses are pointless though, another of my offline clients actually uses it to very good effect. He’s a very good artist, and so he has genuine “fans” that check out his Facebook page to keep up with his latest art work. He provides value to them by posting pictures of his latest work, and just generally chatting to them, answering any arty type questions. I’ll even link to his page so you can check it out for yourself:
http://www.facebook.com/pages/Mike-Grattan/27688003492?ref=ts
You can see the difference between his Facebook fan page and the bog standard business fan pages I’m sure you’ve all come across, I have no data to be able to put a figure on it, but the vast majority of business fan pages on Facebook are like Ghost Towns.
Even our very own D9 Hosting Facebook fan page:
http://www.facebook.com/pages/D9-Hosting/20700629688?ref=ts
Isn’t a hive of activity, despite people using the service on a daily basis.
So I just really don’t get the point of a lot of these businesses having Facebook fan pages, there is obviously some potential there, purely due to the number of people that use Facebook, but as of yet, I’ve come across very few that have been able to make Facebook “work” for them, on a business level.
Thoughts?
P.S. As you can see from the screen shots in this post, I do have a Facebook page, but it’s used purely for people I know in “real life”. So please don’t be offended if any readers have added me in the past and I’ve declined, it’s purely because I don’t know who you are, it doesn’t mean you aren’t cool, or look funny, it’s just me keeping work and play very much apart 😉
P.P.S. If you are a friend on Facebook, and I’ve never met you in real life, I was either intoxicated when accepting the request, or you are very, very special! 😀
CRIPES!!
I’m not sure if this warrants a post or not, but man flu and extreme tiredness can do strange things to one’s mind.
If you look over to your right, you will see a speldiforous blue banner containing a guy whose divorce papers just came through.
Said guy hasn’t really got divorced, that was a joke.
He’s actually really happy because he just watched a video that showed him how to make $233 a day by smashing all the rules.
He hasn’t really watched that video, but that’s not a joke, it’s an assumption.
He’s a stock photo man.
But I don’t think you are supposed to believe the guy has watched the video, or even knows what the internet is, he’s just filling a bit of space on the banner.
His eyes are far too blue and his teeth far too white.
He’s also far too happy, nobody can ever be genuinely that happy, and that’s coming from an 85% moderately happy guy.
But yes, it’s a banner advertising a make money online product, and since everyone has now developed a conscience (noun – the inner sense of what is right or wrong in one’s conduct or motives, impelling one toward right action) we’ve decided they are all pure evil, right?
Well not really, you can’t tar everyone with the same brush. I’m from Yorkshire but I have never once had sex with my cousin, please don’t tar us all with the same brush.
The banner to your right is advertising a product called “Instant Internet Lifestyle” by Lee “CRIPES!” McIntyre.
I can’t say as I’m overly keen on its name, but the product and the person behind it I can vouch for, and that’s why I’m promoting it.
Side-note – Other people vouch for it as well.
Lee is different to other “Marketers” because he actually is a Marketer – BOMBSHELL!!
Not only does he show other Marketers how its done, he works with businesses and individuals not in the IM world, he practices what he preaches.
He isn’t another “Marketer A” that runs a business purely by showing “Marketer B” how to “do stuff” in exchange for $x7, and then “Marketer B” returns the favour to “Marketer A” and they keep swapping money (usually contained the digit 7) between them and patting each other on the back until their hands are sore.
So yeah, that’s why I’m promoting it.
If you want to check it out, that’d be dandy – and try clicking on the stock photo man when you do click the banner, if you imagine it in your mind, he’ll make a noise when you click on him. If he makes no noise, your imagination is rubbish.
An Interview With Aaron Danker
Interviews are a great way to produce a blog post without having to actually write anything, the sun has made me lazy, and as such instead of a normal blog post I’ve sent off some questions to another local marketer; Aaron Danker.
I promote a lot of Aaron’s products, and I hope you will find the following interview at least a little bit useful.
Q. Before I start asking the proper questions, could you give the readers a brief overview of who you are and what you do?
Sure, my name is Aaron Danker. I’m 27 and I’m just a simple humble guy with an ambition. I left school with GCSEs and A-levels, even a BA in Computer Games Design, but never managed to get my feet firmly on the ground and settled with a job.
I’ve always believed that there is more to this world than just going to school, getting an education, getting a job, working nearly every do of your life, getting married, having kids and growing old, worried and in debt. For me, that’s not living – that’s just existing.
For me, being able to do what you want, where you want and with whom you want is the definition of wealth. You can have a great income, but if you’re tied down to a boss telling you what to do or where to go, then you’re restrained. You can have all the freedom in the world, but if you have no money, how you going to go anywhere or get what you want?
The internet definitely opens up the gates for this so since it’s here why not use it?
Q: How did you first get started in Internet Marketing?
I didn’t even know the term existed until I actually started getting involved in it! Before this whole ‘internet marketing’ business came about, I was trying to make money on eBay selling unwanted items. This was way back in early 2007. When I started looking around I couldn’t help but notice the amount of ‘eBooks’ that were listed for $0.99. What attracted me to them at the time is how people managed to make money selling these downloadable items for $0.99.
One of the first products I even bought online was ‘How To Set Up Digital Delivery’. This was selling for $0.99 on eBay and came with its own reseller’s kit – it was immense 🙂
I thought that if I could somehow automate the way a product was delivered to a customer after they made a payment for one of these eBooks, then I could essentially automate the way I make money.
So what did I do?… I took the same product and listed on eBay. I managed to sell it for $0.40. In fact I made a loss when you take into consideration eBay fees, but I was happy because it was the first sale I ever made! From then on I was hooked!
Q. I first came across you when you were just starting out, I think one of the first products you asked me to promote was about Tattoos? Did you find it hard to get people to promote your products when you were first starting out?
Yes that’s right. One of the early products I asked you to promote was a ready-made tattoo niche package for internet marketers. I was doing well selling tattoo designs on eBay back when digital delivery was still around so I thought this would be an excellent offer to put together to help other marketers cash in on this niche.
Getting people to promote my product wasn’t my main concern at the time. My intention was to create a quality offer and set up a website with the hope of continuously selling it. I had no affiliate program in place, I had no idea on how to promote my product, nor was I building a list. I was lucky enough to pick up any sales back then so I knew I had to start changing my tactics.
Q. Everytime I promote one of your products I always get positive comments about your sales page graphics, do you design all the sales pages and graphics yourself?
Yes I do all the graphics myself. I have hired others to do the work for me, but I’ve been disappointed to say the least with the quality of work. So for now I’d rather do the graphics myself and do the job properly!
Q. If yes, have you ever considered doing a bit of graphic design freelance work on the side?
I consider myself to be more of a marketer than a designer. I have done mini-site graphics privately for others in the past. However as a marketer, it’s not the most productive thing for me to do. It takes a full day to produce a complete mini-site graphics set, yet that time can be used to create a new promotion with PLR products.
I could get $300-$500 for doing private work for someone else. I work once, I get paid once. However I could generate $1000-$2000+ for doing a promotion, and more importantly an on-going income by promoting it again and again with my auto-responder. Which would you rather have?
This is why I’ve had to turn down a lot of graphic requests in the past. As I say, I consider myself to be more of a marketer than a designer and would rather cater to the needs of 1000 people than 1 person.
However despite this my partner and I still provide personal graphic services for others at XtremeWebTemplates.com
Q. Over the past 18 months or so, the vast majority of your products are priced under $20, with a lot priced at $10. Why do you charge so little for them?
There’s a couple of reasons why I create low-priced products that over-deliver on content.
Firstly, if you’re going to spent $10 on anything online, you can’t expect a lot. So when I over-deliver on content it goes against their expectations which means high conversions and lower refunds.
Secondly, it’s a chance to expose my second offer. After the $10 purchase, I like to provide an even better deal. This could be more of what was just bought, or could just another great offer. I could price this from $10 to $97 or more depending on the offer, but this is more that would not have been made otherwise. If had a $97 price tag from the beginning, this would have put off a lot of people from the site. I want to include as many as possible.
Q. How many products on average would you say you create each year?
Every year I find myself making more and more products. I’m currently running 3 memberships which provide ready-made products for others. With these memberships alone, I have to create a total of 5 per month (60 per year). On top of that I create about 5 new offers every month for promoting and maybe 1 ClickBank product if I can fit it in. So you’re looking at roughly 120 products per year. This may sound a lot, but a lot of them stem from PLR works and are built for members.
Q. How long does it take for you to create a product from start to finish, do you create all of the material yourself or do you outsource some of the tasks?
When I first started out, I use to spend about 1-2 weeks writing ‘how-to’ guides from scratch! I’d spend another week or so on the website itself and write up a sales page and create some graphics for it. All in all, you’re looking at nearly 1 month before I could actually get my product up for selling. This was early 2008 when I was still a newbie and struggled to write sales copy, struggled with Photoshop and just slow at putting up a website. This is a fine example of how NOT to do things 🙂
Fast forward now and you will NEVER find me creating a product from scratch. I always work with something that’s at least got the product half-made and the sales page content written up. Everything else can be moulded to how I see fit. I invest heavily in PLR products, and out-source a lot of written work. The only thing I concentrate on now is graphics and because I’ve had a lot of practice with Photoshop and enjoy doing it. I also have my own scripts, PSD templates, and ready-structured mini-sites, and useful find and replace program, so I can churn out a new looking product within 24 hours.
If I want to create affiliate resources, I’d spend another day putting that together. Then on the third day I’d prepare my promotional emails, launch them and also add them into my auto-responder. These days I have to be quick when creating products especially with the number of membership sites I’m running!
Q. A lot of the $10 products I’ve promoted for you come with 100% commissions, how do you manage to make this profitable for you, is it all about building a list or do you have a number of back end systems in place?
This is true. Again it’s a case of attracting affiliates and customers to promote something that they just bought. I love automation – so if all it takes is one day to create a $10 offer and give 100% commission in exchange for a continuous sign-up of buyers then I’m happy.
Anyone can just put together a quick site and give 50-75% commission but what makes your affiliate program different from any other? If you put yourself in the minds of your affiliates, and give them everything including instant pay, along with materials such as articles, banners, blog reviews etc., then they’ll jump on it straight away!
My intention is not to make money on these offers – even though I do with an initial launch and auto-responder sequence – but to gather as many buyers as possible so that when I have another offer ready I can repeat the process and even up-sell my high-ticket items.
Q. I know firsthand how popular your $10 products are, but have you ever tried selling any higher value products, and if so how did they go down with your subscribers?
Yes I do sell higher priced products which range from $47 to $197 and a couple at $497 but these are offered to qualified people that already have a firm grasp of what they’re doing online.
Like many marketers who are involved in list-building I have a lot of freebie seekers who will sign up for your free gift, but then do nothing else once subscribed. These are not the people you want on your list because it’s only running up a larger bill on your Aweber account.
This is why I create a lot of low-priced offers (even $1 offers) and offer 100% instant pay commission on them. They are essentially list builders for buyers only. If someone has bought a product from me in the past even for $1, I know that they’re willing to spend and do business with me in the future in order to develop themselves. These are the sort of people I want to cater to and where I spend more of my time on.
With high-end offers you have to be in front of the right kind of people. For example, if I created a fantastic looking ClickBank site with resell rights that sold training videos on how to fix your xBox, only the seasoned marketers would see the value in it and buy. However, if I presented that same offer to complete beginners who didn’t know what an index.html was or how to upload with FTP, I’d be getting a lot of support emails and refunds! It’s all about targeting your offers to the right kind of people.
Q. If I made you look back over the years and asked you to pick the best product you’ve ever created, what would it be, and why?
Honestly, I’ve had a lot of success with almost all the products I’ve launched. They continue to sell even to this day despite the fact that I haven’t updated them for years.
I think it’s important to note that it’s not about the product itself, but what niche or sub-niche you’re in and what you can do for that market. For me, I seem to fall into the RR/MRR/PLR niche – and what I’m able to provide is solid graphics and good looking websites.
But if I had to start again and didn’t have a single website to my name, the first thing I would build is my main membership site – Platinum Resell Rights.
Although I had a wobbly start, it’s definitely the bread winner out of all the sites I’ve created. I think the main reason is because it’s an on-going service that I’m able to provide without sacrificing time doing individual private work.
Q. If you could go back, would you have chosen another sub-niche or market?
I think I’ve ended in this market now because I try to fill a demand. When I first started I would have no idea what market to enter, whether it’ll be profitable, how to create a mini-site and so on. Where I’ve ended up is after months and months of refining.
Q. What are your plans for the future are you going to keep working with the system that has served you well so far or are you looking to expand into different areas?
I’m going to continue doing what I’m doing until I’ve got enough time and money to invest seriously PPC. For me, this is the pinnacle of making money online.
You simply buy traffic and convert it into sales by sending them to the right offer. The difference is profit (or loss) but it’s the simplicity and lack of interactivity that appeals to me 🙂
There’s no need to put up a website, build a list (unless you want to), create a sales page, build links, write articles, deal with emails etc. etc.
Of course this business model does come at a price – RISK. I’ve done a bit of PPC but never really gone full swing into it which is why I plan on using my current business to fund this new venture.
Q. Looking back, what would you say the biggest mistake you’ve ever made in your online business?
Mistake is such a harsh word. I don’t think I’ve made any epic mistakes that could cost me – maybe because I haven’t taken enough risk?… depends which way you look at it. I have however had minor set-backs and disappointments where a promotion didn’t do as well, or if I didn’t make as many sales as I hoped.
The point is to be receptive to what you do online and understand why. Was it the offer? Was it priced too high? Was the quality of the offer bad? Was it too complicated? Was it aimed at the wrong people?
The biggest mistake anyone can make is giving up and going back to work in the offline world. I don’t plan on going back – and why would you want to? Getting up in the morning, going to work, getting paid minimum wage, and just scraping by? No thanks. I’d rather get paid for using my brain and being creative and get paid handsomely for it!
The internet really does open up the doors for a lot of potential but it’s only there for people that want to take it.
Q. What would you say is the number one most important skill a marketer can have?
The skills you need will vary on what you do online. For me being able to create unique looking mini-sites is what allows me to separate myself from the rest. However as a general overview, the most important skill that any marketer can do with is the ability to generate targeted traffic. With this skill alone you can be a product creator, an affiliate or an Adsense publisher, it doesn’t matter. If you can generate traffic to a site, you can make money online.
The next most important skill is the ability to sell. If you’re a product creator this is quite obvious because you need to write great sales copy or a convincing video presentation to get people to take action. Even if you’re an affiliate, you will still need to create landing pages that get people to click where you want them to. Or even if you’re a product owner and need to convince affiliates to promote your product you still need to write great sales copy.
For me these are the most important skills that everyone needs if they want to make money online!
Q. Have you got any words of wisdom for people wanting to start their own business online or who are desperate to start making money online now?
Yes! Firstly stick to what you DO know and use that as a point of leverage. Find what you’re good at. If you’re good at writing – get involved in writing articles for others as a freelancer or even think about starting your own article membership where you provide PLR articles on a consistent basis! If you’re good at programming- get involved in forums and find out what people need and create a program for it or provide a service for them. If you enjoy teaching (no matter the subject), think about creating a video training course and setting up a sales page to sell your expertise. If you can play an instrument, create training videos and put them on YouTube and recommend training products as an affiliate! I don’t care what you say, we all have something that we’re good at… and if you honestly think you’re good at nothing, dedicate time to become good at it!
Secondly, learn all the basic skills that you need to know in order to get yourself set up online! Do you need to learn to upload?… then learn it! Do you need to learn to create a sales page?… then learn it!… Do you need to learn how create an eBook?… then learn it! There’s no excuse for NOT knowing how to do something especially when a simply Google search will provide you with all the answers.
Thirdly, be real! Get it out of your head that just because it’s ‘online’ that it’s suppose to be easier to make money. This is utter non-sense. In fact, when I tell others that I make money online they immediate think ‘scam’ or that I don’t do any real work. This the mentally of poor minded people – I’ve even had to re-phrase my titled to ‘website designer’. Not everyone can dedicate themselves or have the discipline to make a living online – they are better off working a normal job.
Fouthly, stop messing around! If you really want to make this work for you – get rid of that TV, unplug that phone, turn off your mobile, and dedicate a room just for yourself where you can shut the door and concentrate. Distractions (including people) will stop you from progressing and it’ll just take you longer before you get anything real done.
Take action every day and have a plan on what you need to do. Use Google calendar to start planning what you should be doing every day. Do you need to put up your first squeeze page? Do you need to watch training videos? Do you need to buy hosting or a domain or an server scripts? Do you need to promote your site? Do you need to write an auto-responder series? Do you need to create a free report? Do you need to create an offer? Do you need to create graphics for your site? There’s never a day that goes by where I don’t have anything to do. Even if you take baby steps you’re eventually going to accomplish something much bigger!
Fifthly, become emotionally retarded! That’s right – it’s probably the only thing you should regress. If something didn’t go to plan don’t quit. If you didn’t earn as much as you wanted to with a promotion, don’t get emotionally involved. If you get a refund on something you worked hard on, don’t take it personally. If other’s tell you that you’re wasting your time online, smile and continue with your business. There’s only one person to rely on in this world and that’s YOU! So get to work and start making money!
 About
About
Aaron continues to create products for other marketers. His reputation for quality graphics and resell rights products is what makes his membership Platinum Resell Rights a consistent source of income for other marketers. You can pick up a free 2 hour training video on how to set up your own website at PlatinumResellRights.com
Receive FREE Email Updates, according to one reader it's....
"Better Than A Poke In
The Eye With A Sharp Stick"
Currently Enjoy This Blog More Than Christmas.
Follow Me Via RSS!

Subscribe to this site's RSS feed.