

How To Create A Custom PayPal Checkout Page
How To Create A Custom PayPal Checkout Page
Greetings hello and welcome to a long overdue blog posting. I’ve been run off my feet with one thing and another the past couple of weeks, hence no blog postings.
I put aside 30 minutes today to write a post, but until yesterday I was really struggling for a subject.
Then, without warning PayPal decided to have one of their customary “Let’s screw with Dan’s account†days.
They decided that after over 2 years of having my personal bank account linked to my business PayPal account, I’d been having it far too easy so it was time to put a stop to this!
After I made a withdrawal to my account last week, I got an email from PayPal saying the withdrawal failed and the bank account had been removed from my account.
I tried to re-add the account but it wouldn’t let me add an account using my name, the bank account name had to match the business name in PayPal. (El Passo Enterprises)
That was a bit of a problem because I don’t have a bank account called “El Passo Enterprisesâ€, so the only option was to downgrade to a premier account so I could use my normal bank account with the PayPal account.
The problem with this – whenever a buyer goes to the PayPal checkout page, instead of seeing a professional business name they would see the email address that they were sending payment too, which I think looks a bit crap!
So I decided to create a custom PayPal checkout page to get around the email address display problem. Here’s what my new checkout page looks like:
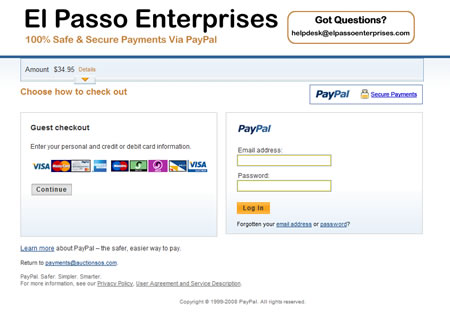
And here’s how you can set up your own!
1. The first thing you need to do is create a header image, this will go at the top of the page. The ideal size for the header (as stated by PayPal) is 750px * 90px.
2. When the header has been created, you need to upload it to your web space, BUT, and this is important. It needs to be uploaded to a secure server, if you don’t upload it to a secure server your browser will display an “Insecure Items On Page†error message and this could put off your buyers.
Most hosts will have a shared SSL certificate that you can use, I uploaded my image to my D9 Hosting account, and the image is stored securely here:
https://bullseye.d9hosting.com/~paudan/images/danpp.jpg
If you are also with D9 Hosting, the URL to your shared space will be:
https://bullseye.d9hosting.com/~YourUsername
If your host doesn’t provide you with a shared SSL….maybe it’s time to switch to someone else!
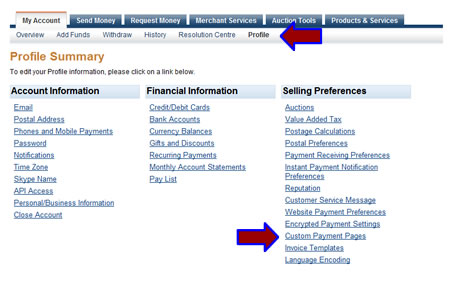
3. With your image created and uploaded, you need to log into your PayPal account and click on:
Profile > Custom Payment Pages
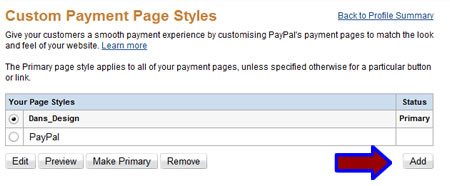
4. The next step is to add a new payment page; you can do this by clicking on the “Add†button.
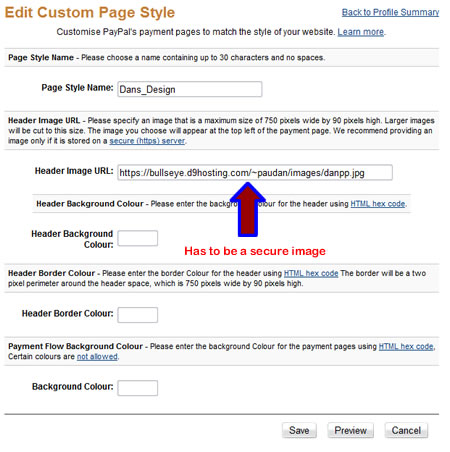
5. You then simply need to give the theme a name, and then enter the URL of your secure header image in the “image URL†field.
You can also specify different page and border colours, but I decided to stick with just the header!
When you are done, click on “Saveâ€.
6. The final step is to go back to the Custom Payment Pages overview page and set your design as the primary style, when you have done this all of your PayPal payment pages will use your new design!
And that brings to an end this guide. It’s fairly simple to create your own payment pages in PayPal but as always, if you have any questions and comments please leave them below!
Cheers,
Dan
Receive Free Email Updates When A New Entry Is Posted. Join Them! |
Comments
51 Responses to “How To Create A Custom PayPal Checkout Page”Receive FREE Email Updates, according to one reader it's....
"Better Than A Poke In
The Eye With A Sharp Stick"
Currently Enjoy This Blog More Than Christmas.
Follow Me Via RSS!

Subscribe to this site's RSS feed.
Thanks for taking the time to write about this as I have recently had exactly the same problem, and was pulling my hair out for a solution.
I’ll now give this a try……….. Thanks again Dan
Lee
Great Job Dan
I’ll give this a try if the Paypal monster rears it’s ugly head.
Ray
Hi Dan
I always find your blog posts useful and this one is no exception.
Cheers
Stuart
Interested in an extra couple of hundred a week for an hours work a day on eBay? check out http://www.printsmakeprofits.com
Hey Dan,
Once again, a great blog post. I’ll have to pull my finger out and try that one. What you talk about with Paypal is pretty scary and i suppose it’s worth remembering to use more than 1 payment provider. I know I’ve also been a bit lazy of late but i really should look into using google et al as another alternative to client payments. Paypal now getting a little too big for its boots!
Desdrec.
Yo Dan,
I love that you just know everything techy 🙂
And even better that you keep writing mini reports and uploading them free onto your blog – instead of charging for them….hehe
Great post Dan
Randy
http://www.RandolfSmith.com
Hi! Dan,
this is useful and right timing as well, PayPal follows the eBay path and implement change after change, after change, wandering when they will stop the madness.
Great Job, Thanks a lot!
Regards
Michaela
hehe, don’t tempt me Randy!
Sometimes I think it would be easier if I made little booklets.
Yesterday I was looking for a post I did ages ago on Aweber and the forward variables but it took me ages to find it – I think the blog is too big 🙂
If I had each topic in a nice little booklet it would have solved my problem!
Thanks Dan
This is brilliant. I just upgraded to a business account to get rid of the crappy email address. Excellent to know that there is an even better way.
And generous of you to share!
Thanks again
Stan
Great guide Dan!
My business account is under my own name so hopefully I won’t encounter this problem but I still can’t help myself… I’ll have to add my logo!
Thanks again,
John Szram
http://www.johnszram.com
Brillient Dan! 😀
I never even knew that you provided a shared SSL! I’ve come accross a few custom Paypal Payment pages before, and it’s always poped up with the warning. All it takes is 5 minutes to upload the image to a secure server! (I guess it’s probably a little harder then just that though!)
Thanks
Mark
Wow Dan Out Standing information I can now make my own account look more professional
Thanks Man!
By the Cringe Dan – you’ve just solved a problem I hadn’t even put into words – but knew I wanted solving!!
I’ll just have to sort this one out when I get time.
Thanks, and Thanks again!
I really appreciate the help you give – and glad I moved to D9!!!
John o’York
Dan,
This was a really great post, and in the nick of time – don’t you just love paypal
Hiya Dan As usual well worth taking time out to read your blog (and emails) Following on from Mark McWilliams comment “to upload the image to a secure server! (I guess it’s probably a little harder then just that though!)” Is it possible to show the steps how to do just that? A little tutorial on: How to upload a logo to a Secure Server?
Hi Zoe,
You don’t actually have to upload your images, or anything for that matter to a different place on your server, everything is already there!
You just replace http://www.yoursite.com with the secure URL:
https://bullseye.d9hosting.com/~UserName
So an insecure image would be:
http://www.yoursite.com/images/pic.jpg
And the secure would be:
https://bullseye.d9hosting.com/~UserName/images/pic.jpg
After I left that comment Zoe (And Dan for that matter!) I was kinda puzzled for a few seconds until I started playing around and found out the answer myself.
If I’d been 5 minutes longer, then I would have just MSN’ed Dan and asked him to point me in the right direction! 😀
Again though, a GREAT tutorial and one for the swipe file!
Thanks
Mark
Hi Mark
That’s why it’s good to ‘talk’ eh?;) Perhaps others (like myself as a newbie) was left wondering the same thing too. Didn’t have time to tinker like you have and with Dan’s clear step by step explanation (as usual) I too am taking it and placing in my swipe files.
Hi Dan
Thanks for the quick reply and mini step-by-step tutorial. I am sure it is more than appreciated by newbies like me. Can’t wait for your next posting…
Hi everybody
could any one help me, when the user is brought to checkout page of paypal the products detail are hidden and only the totals are shown, when we click on that arrow it expands the details, can we setup paypal to show the full products when customers are brought to checkout page.
Thank You
Hi Mussa,
When you create a paypal payment button, you enter an item name. That name will then be shown during the checkout process.
Well done post! In fact, I’d love to re-print it on my blog – I’ll send you an email.
Michael
Thanks Dan. I am struggling to integrate PayPal into an on-line conference registration system. I want to get registrants information and puit it into a MySQL database and I need to have them checkout with PayPal. I seem to be able to do one or the other! Does your El Passo Software site capture users in a MySQL datasbe or do you some how get that info from PayPal?
Hi Greg,
I use delivery scripts for all my checkout…stuff!
It stores buyer details in a DB, directs them to PayPal and sends out confirmation emails after they have paid.
The main script I use is DLGuard:
http://www.dlguardreview.com
Thank you Dan. I really appreciate your help!
Thank you so much,great tutorial……….the screeshots made it so easy to follow you!!!…………… Now, I’m wondering how you get to the layout(bellow the header) displayed in the tutorial??…Do You need a special paypal feature or account in order to get to that layout??……….is there any way to customise it……….I ask you this because the one that appears in my payment page is different it desnt says for example CHOOSE HOW TO CHECKOUT at the top like yours and the credit cards looks a lot bigger in your layout.
So please if you have any advice regarding this, let me know………Thank You!!!
Hi Luis,
I think it’s down to the account type, you need either Premier or Business. I think there could also be a setting in your profile to “Accept credit/debit cards”
I just really need this! Thank you
Thanks for the post. I had customized my checkout page once before, but had conveniently forgotten *how* in the last couple months.
No problem, glad you found it useful!
OMG Dan. I have spent ALL DAY on the phone to various tech support people at Paypal and 1&1.com trying to get my logo onto the paypal checkout page. HOURS It always takes me at least 10 minutes to get the person on the other end to understand what my problem is, I get transfered all over the place and no one can help in the end. And then (randomly) I found you. Thank G
So any who, the basic 1and1 eShop account I have doesn’t allow me direct access to my shared server space. Total Rubbish! Even though I have 2Gig capacity and am only using 7MG, the automaton on the other end of the phone could only read from her script and told me that there’s no way they can help me get this logo briefly onto a secure server so that I can get it onto the paypal server which (according to the paypal rep) it will then live and wont be linked to the server it came from. Now what? I’m trapped in a web indifference, inaccurate information, and an intolerable indifference to customer needs.
Can I “borrow” server space? I’m not a techy, I don’t write code, I’m just a lady trying to build a nice webstore
Hi,
My first advice would be to avoid 1&1 like the plague…but it looks like they already have you trapped 🙂
I’m sure we could work something out if you just wanted to store your logo on D9 Hosting’s shared SSL. Do you want to drop me an email and I’ll see what I can do – dan *******at******* d9hosting.co.uk
Hi there,
I managed to get the custom image loaded on the page… Thanks for this article! However, on your example page, you have a format below that says “Choose how to check out” and the 2 methods are very obvious.
I have been trying to figure out if there is a way to get that configuration as well, or if that is just an older template that they changed?
My site loads a paypal page from the button that has the Paypal login box dominating the page with a very tiny text link that says, “don’t have a paypal account?” for those that want to use credit cards. The link is very easy to miss and I do get visitors who think they MUST use paypal since the credit card choice is so inconspicuous. Is this their new layout or is there some way I can configure the page to look as your example shows?
I appreciate the post!
Thanks
Chris
I think PayPal changed that layout some time ago, maybe they want to encourage people to pay with PayPal rather than a card.
My checkout pages now only have the small text link option available – so it’s not just you 🙂
“Don’t have a PayPal account?
Use your credit card or bank account (where available). Continue”
Hi Dan, great article mate. Here’s a bit of extra info for your readers. Lets say you don’t want to change your primary page style. Maybe you use that for your Ebay account but want to have a seperate header for your website. You can add this code to your payment/subscription button and it will load the relevant page style for you:
Just change the xxxxxxx for the name of your page style.
Hope this helps 🙂
Richard
oops it didnt put the code in 🙁
Argh its still not putting the code in the post??? hmmmmmmmm how can I add the code dan for your readers?
Ok I’ve turned the code into an image which you can view here:
http://www.rlb-publishing.co.uk/paypal_page.jpg
🙂
That’s done the trick, thanks for the tip 🙂
Brilliant – Been looking how to do this for ages, you are a star
Happy to help!
I wish they would add templates to choose from in paypal, and just modify those for an easy page setup.
Hi Dan,
Am followed your procedure and updated but it was not showing in main page, am using subscription type in paypal (), not normal type , if you can help me…
Thank you for leaving this blog up! It really helped me to create a simple and effective banner to replace the default (and ugly) e-mail address.
i have 5 emails for payments, different products, any idea how to make custom banner for each individual payment email address? thanks
Hi Sam,
As far as I know that isn’t possible, I think you can only have 1 custom page per PayPal account.
Thanks for the Idea.
Can you please do a tutorial how to make checkout pages then after they purchase the downloadable item will automatically download after the purchase’s payment made.
thanks
Hi Gilbert,
DLGuard will do that for you, check out my review:
http://www.dlguardreview.com/
Thanks Dan,
I will try 🙂
Great idea adding your contact info to the custom header image. Im going to use this on my custom checkout pages. Thanks 🙂
I have created a custom page and that worked beautifully, when test all seems fine until I looke at the right hand side it has everything you need to submit a payment but, hold the phones it wants you to create a paypal account before you submit payment, I truly can not have that is there a way not to force customers to to create a paypa account?